Table of Contents
FFSM++ development instructions
The overall FFSM++ development environment requires a little bit of efforts in its start-up, due to the many tools used, but on the other hand once all these tools has been set-up it results in a very powerful one.
Setting up the Development Environment
The FFSM development itself is done using Qt Creator, a multi-platform Integrated Development Environment (IDE) based on the popular Qt libraries.
This section contains detailed instructions on how to get and install the IDE and all the necessary prerequisites, in both Windows or Linux environment. For the former, third party libraries (IPOPT, Adol-C, ColPack) are already available within the FFSM source code repository, so the instruction for their installation refers only to the case that a new version of them is released and the user want to upgrade to it.
 NOTE: It's many years we don't try the Windows procedure, so it is likely to be obsolete. We strongly suggest to use FFSM in Linux, eventually using a virtual machine or the Windows Subsystem for Linux (WSL).
Linux (Ubuntu 22.04)
See older revisions of this page for older Ubuntu systems and for tips to solving some errors no longer occurring in Ubuntu 18.04 and 16.10.
The following packages and their prerequisites should be installed:
sudo apt-get install build-essential gfortran gcc g++ gcc-12
sudo apt-get install libtool libtool-bin git patch wget pkg-config
sudo apt-get install zlib1g-dev libboost-all-dev  libblas-dev liblapack-dev liblapack64-dev libmetis-dev libatlas-base-dev
sudo apt-get install qtbase5-dev qtbase5-dev-tools qtchooser qt5-qmake qtcreator
(not all are likely to be necessary, we just tried successfully this combination)
Create a folder for installing the various FFSM dependencies. Here we use `~/programs`:
cd ~
mkdir programs
cd programs
Ipopt
Ipopt is the solver engine used by FFSM. Itself it uses several libraries. The procedure describe below installs all the “third parties” IPOPT libraries and finally IPOPT itself.
For using the HSL linear solver (optional, as it requires a free academic licence, but way faster than MUMS) go to http://www.hsl.rl.ac.uk/ipopt/ and download “Coin-HSL Full (Stable)”, “Source”. Wait for the email with the link and then unzip, rename and move the archive as to be `~/programs/Ipopt/ThirdParty/HSL/coinhsl`
mkdir Ipopt
cd Ipopt
wget https://github.com/coin-or/Ipopt/archive/refs/tags/releases/3.14.16.tar.gz
tar -xzf 3.14.16.tar.gz

cd ~/programs/Ipopt
git clone https://github.com/coin-or-tools/ThirdParty-ASL.git
cd ThirdParty-ASL
./get.ASL
./configure --prefix="/usr" 'CXXFLAGS=-O3' 'CFLAGS=-O3'
make
sudo make install
cd ..
git clone https://github.com/coin-or-tools/ThirdParty-HSL
cd ThirdParty-HSL
[extract the HSL archive as `~/programs/Ipopt/ThirdParty/HSL/coinhsl`]
./configure --prefix="/usr" 'CXXFLAGS=-O3' 'CFLAGS=-O3'
make
sudo make install
cd ../Ipopt-releases-3.14.16/
mkdir build
cd build
../configure --prefix="/usr" 'CXXFLAGS=-O3' 'CFLAGS=-O3'
make
sudo make install
cd ../../..
ColPack
- Site web: https://github.com/CSCsw/ColPack/
- Needed ColPack >= 1.0.8
- Type:
git clone https://github.com/CSCsw/ColPack.git  # Download ColPack as ~/programs/ColPack
cd ColPack                                       # ColPack Root Directory
git checkout 10b780b52a25c6ccef3d2abc12055ee85b7e8667 # checkout a version know to works
autoreconf -vif
./configure --prefix=/usr 'CXXFLAGS=-O3' 'CFLAGS=-O3'
make
sudo make install
cd ..
- (alternative) Type:
git clone https://github.com/CSCsw/ColPack.git  # Download ColPack as ~/programs/ColPack
cd ColPack/build/automake/
autoreconf -vif
mkdir mybuilds
cd mybuilds
../configure --prefix=/usr 'CXXFLAGS=-O3' 'CFLAGS=-O3'
make -j 8
sudo make install
cd ../../../..
ADOL-C
- Type:
mkdir ADOL-C
cd ADOL-C
wget https://www.coin-or.org/download/source/ADOL-C/ADOL-C-2.7.2.zip
unzip ADOL-C-2.7.2.zip
cd ADOL-C-2.7.2/
./configure --enable-docexa --enable-addexa --enable-sparse --prefix=/usr 'CXXFLAGS=-O3' 'CFLAGS=-O3'
make
sudo make install
Symlinks
- On 64 bits Linux, symlink all libadoc.* libraries from /usr/lib64 to /usr/lib:
cd /usr/lib
sudo ln -s ../lib64/libadolc.la .
sudo ln -s ../lib64/libadolc.so .
sudo ln -s ../lib64/libadolc.so.2 .
sudo ln -s ../lib64/libadolc.so.2.1.0 .
sudo ln -s ../lib64/libadolc.so.2.2.0 .
- Make a symlink in the include system directory to the new name of coin (coin-or):
cd /usr/include
sudo ln -s coin-or coin
Libtool
(may not be necessary)
libtool –finish /usr/local/liblibtool –finish /usr/lib
Windows (XP or 7)
New Sept 2018 (work in progress)
Download:
- qt installer from https://qt.io
- modules Qt 5.11.1 (MinGW 5.3.0 32 bits)
- tools:
- Qt Creator 4.7.0 CDB Debug Suport
- MinGW 5.3.0
- Qt Installer Framework 3.0
- Git for windows from https://gitforwindows.org
- Tortoise Git from https://tortoisegit.org
MinGW
MinGW is the windows version of the g++ compiler, together with a minimal unix-style environment that allow to compile unix programs natively in windows.
Please follow the instructions below:
- Download the MinGW environment installer (http://sourceforge.net/projects/mingw/files/Installer/mingw-get-inst/mingw-get-inst-201XXXXX.exe )
- Launch the installer
- Select “Download latest repository catalogue”
- Select C:\MinGW as folder. Do not change this setting !!
- Select the following components:
- C compiler;
- C++ Compiler;
- Fortran Compiler;
- MinGW Developer Toolkit
- Open a MinGW shell: START→All programs→ MinGW→ MinGW shell
- Type “mingw-get install msys-wget”
- From the MinGW shell you'll find the hard disk content under /c
Qt and Qt Creator
- From “http://qt-project.org/downloads” download:
- Qt libraries 5.X.X for Windows (MinGW 4.X)
- Qt Creator 2.X.0 for Windows
- Install the software
- Install the Qt libraries with default options (leave C:\MinGW when asked where to look for it)
- Install the Qt Creator with default options
- Install the python-enabled debugger (in order to watch STL containers)
- Download the GDB for your environment from http://origin.releases.qt-project.org/gdb/
- Point qtcreator to use it from the options→kits page
- Configure the software
- On Qt Creator, go to “Tools→Options→Build & Run”.
- On the tab “Tool chain” click “Add→MinGW” and feel the field “Compiler path” with “C:\MinGW\bin\g++.exe” and the debugger path with “C:\MinGW\bin\gdb.exe”
- On the tab “Qt Version” click “Add” and browse for the qmake.exe file (that should be in “C:\Qt\5.X.X\bin\qmake.exe”)
Alternative version for installing the Qt libraries from source
- Install first MinGW as directed
- Download qt-everywhere-opensource-src-5.X.X.tar.gz and unzip it to C:\Qt\5.X.X
- Add C:\Qt\5.X.X\bin to PATH in windows
- Run the following script from the MinGW shell
cd /c/Qt/5.x.x
configure.exe -qt-zlib -opensource -release -platform win32-g++
mingw32-make
Notes: These instructions were written for the now obsolete Qt4. We didn't tested them with the newer Qt5 that are required by the model, but we think the procedure should be similar. Qt 4.8.3 had a know bug that required adding QMAKE_RCC = $$[QT_INSTALL_BINS]$${DIR_SEPARATOR}rcc.exe after the QMAKE_IDC line in C:\Qt\4.8.3\mkspecs\win32-g++\qmake.conf
Update 20150929: We didn't yet tested Qt5, as unfortunately as they are now shipped together with MinGW, this would means to update also the windows MinGW compiler. In turn this mean to have to recompile all the ThirdParty libraries. We stuck with the Qt4.8/MinGW 4.6.2 for now.
To allow compilation of the code with Qt4.8 instead of Qt5, just comment “#include <QtWidgets>” and decomment “#include <QtGui>” on top of InputNode.cpp, MapBox.cpp, ScenarioSelectionWidget.cpp and MainWindow.cpp. On this last file also comment '#include “QApplication”'.
To use Qt5 attenction that most likely you will have to give the full path of the external libraries in the project file and you'll have to compile zlib by yourself (as it's no longer shipped with Qt5).
Ipopt (optional)
This step is not required, as a windows 32 version of IPOPT is already shipped with FFSM, but if you want to build your own version of ipopt, e.g. because a new version is available or you want to use a faster linear solver (and you have an academic licence) you can follow these instructions.
- Downolad Ipopt Ipopt-3.XX.X.tgz from http://www.coin-or.org/download/source/Ipopt/ and extract it to somewhere where there is no spaces in the path (e.g. in Win7 the standard “Download” folder is fine, in WinXP it isn't.). In the remaining of this tutorial we'll assume that the Ipopt folder is C:\ipopt.
- In the Ipopt extracted folder create a “build” folder, so that you end up having C:\ipopt\build.
- Open the MinGW shell and type “cd /c/ipopt/ThirdParty”.
- For each of {Blas|Lapack|Metis|Mumps} go in their sub-folder and run from there “./get.{Metis|Mumps}”. This will download and extract them to a place that the ipopt configure will find them.
- For using the HSL linear solver (optional, as it requires a free academic licence, but way faster than MUMS) download ma27-1.0.0.tar.gz, mc19-1.0.0.tar.gz and ma57-3.7.0.tar.gz. Rename ma27d.f and mc19d.f in ma27ad.f and mc19ad.f and place them in ThirdParty/HSL. For ma57, create a file ma57ad.f in the same folder and merge into it all the fortran source code coming with the library (excluding fakemetis.f)
- Type, in the sequence:
cd /c/ipopt/
mkdir build
cd build
../configure
make
make install
- Replace the dll and header files coming with git in win32 ([FFSM_FOLDER]\src\ThirdParty\ win32) from the equivalent ones in C:\ipopt\build\include and C:\ipopt\build\lib
COLPACK (optional)
- Download ColPack >= 1.0.8 (ColPack-1.X.X.tar.gz) from http://www.cscapes.org/download/ColPack/ and unzip it.
- You can choose to have it statically compiled to ADOL-C (better I guess) or dynamically compiled. Performances are actually very similar, with a little improvement for the static linking.
- METHOD 1 - STATIC LINKING (DEFAULT)
- Type:
./configure –prefix=/usr
make
g++ -shared -Wl,-soname,libColPack.so -o libColPack.so <list of object files>
- METHOD 2 - DYNAMIC LINKING
- From the MinGw prompt, follow the method suggested here to compile and install ColPack, adding –prefix=/usr to configure: http://stackoverflow.com/questions/12163406/
- Copy libColPack-0.dll to the root of ffsm and to [FFSM_ROOT]\src\ThirdParty\win32\lib\
Notes: If linking problems arise with method 2, copy also all the other libColPack.* libraries to [FFSM_ROOT]\src\ThirdParty\win32\lib\. ColPack compile but doesn't work with ADOL-C in MinGW g++ 4.7, so for now it must be retained MinGW g++ 4.6
ADOL-C (optional)
- Download ADOL-C (ADOL-C-2.X.X.tgz) from http://www.coin-or.org/download/source/ADOL-C/ end extract it to C.
- Comment lines 71 to74 and 500 to 510 in file [ADOL-C]\ADOL-C\src\adouble.h and [ADOL-C]\ADOL-C\adouble.h (these lines refer to a local definition of fmix() and fmax() that conflicts with that defined by MinGw).
- Open the MinGW shell and type the following commands:
cd /c/ADOL-C
cd ADOL-C
ln -s src adolc
cd ..
- IF YOU FOLLOWED METHOD 1 IN COLPACK (STATIC LINKING):
- Replace all the configure scripts from ADOL-C 2.3.0 with those of ADOL-C 2.2.1. Static linking will not work with the configure system provided in adol-c 2.3.0.
- Create the following directories under the ADOL-C root:
- [ADOL-C ROOT]\ThirdParty\ColPack\build\include
- [ADOL-C ROOT]\ThirdParty\ColPack\build\include\ColPack –>needed in make phase!
- [ADOL-C ROOT]\ThirdParty\ColPack\build\lib
- Copy there the libs and includes obtained from the ColPack compilation. The exact position (e.g. the includes under \include\ColPack or directly under \include) depends on the adol-c versions. Copying them in several positions doesn't hurt as it seems any how that the configure and the make looks in different places.
- Type:
./configure --enable-docexa --enable-addexa --enable-sparse –prefix=/usr
make
- IF YOU FOLLOWED METHOD 2 IN COLPACK (DYNAMIC LINKING):
- Type:
./configure --enable-docexa --enable-addexa --enable-sparse --prefix=/usr –with-colpack=/usr
make
- Replace the dll and header files coming with git in win32 from the equivalent ones from C:\MinGW\msys\1.0\include\adolc, C:\MinGW\msys\1.0\lib and C:\MinGW\msys\1.0\bin (libadolc-1.dll).
- Copy libadolc-1.dll also to the root of Ffsm.
Notes: If you have an error about libtool version mismatch run “autoreconf –force –install” before configure (http://stackoverflow.com/questions/3096989/libtool-version-mismatch-error). Tplease consider that the ln -s command in preparing the ADOL-C compilation actually copys, not links, the two folders.
Getting the source code
- Type:
git clone https://github.com/LEFNancy/ffsm_pp.git
Note: Git repository is currently set private untill we remove from it input data for which we do not have the copyright and hence we can't publicily release.
Developing FFSM
Once the development environment has been set up it is possible to inspect and change the source code of FFSM using the Qt Creator IDE:

A guide to Qt Creator is out of this paper scope, as abundant documentation can be retrieved from either official and unofficial sources. Hence, we describe here just the very basic operations required to modify and compile the code.
To start the IDE click on the file ffsm.pro. The first time Qt Creator will ask the version of Qt to be used for the project, where the default choices can be accepted.
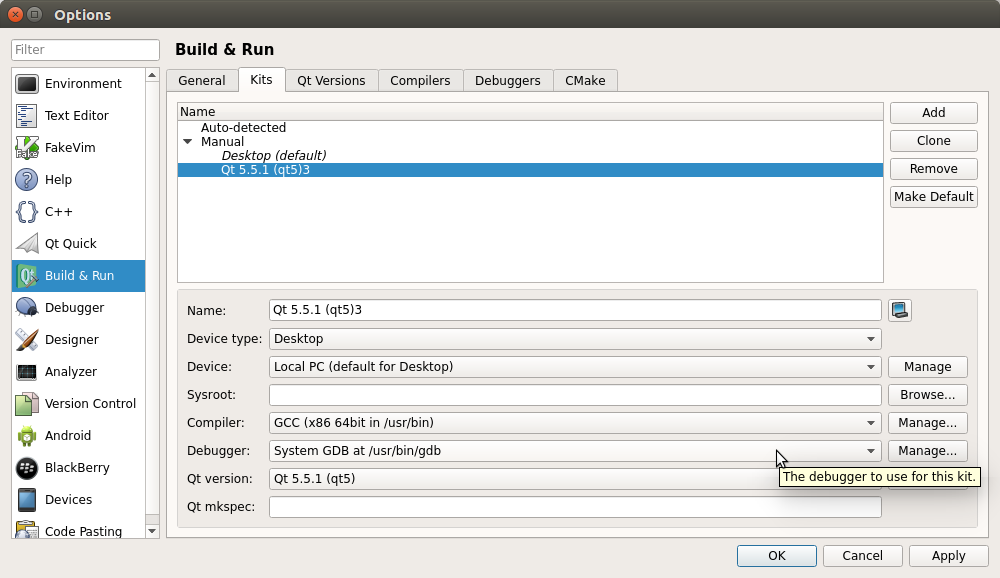
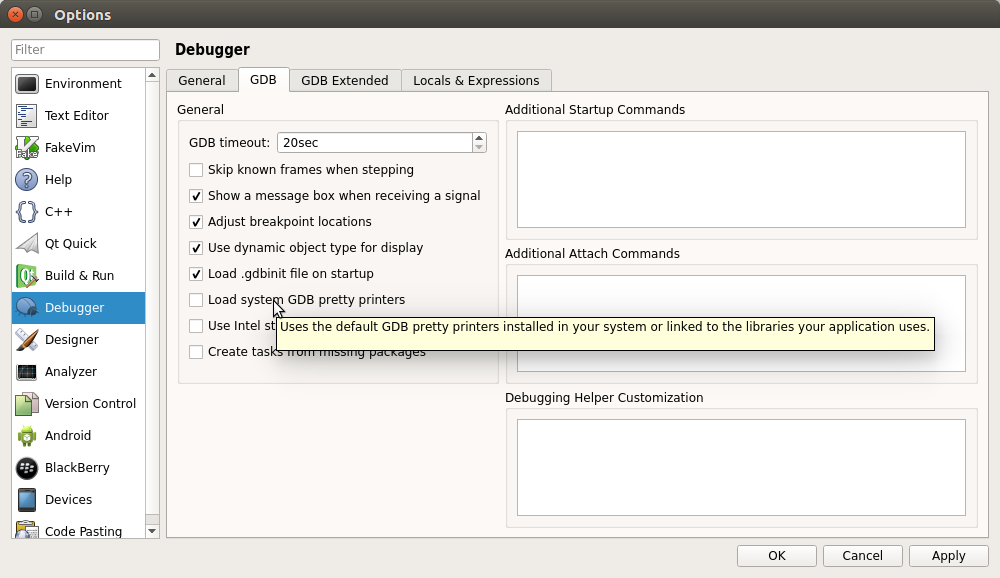
A few tips (see screenshots):
- In the Configure project option, choose the dot (“.”) for the Debug and release directory
- In the build and run be sure that Qt5 is selected as default Qt and the default gdb is selected as debugger (it wasn't in a clean install on my machine)
- In order to watch STL containers while degugging, in the debug options uncheck the “Load system GDB pretty printers”

The icons on the bottom of the left panel allow to perform the main actions at the project level: to compile it (hammer icon), debug it (bug icon) and run it (play icon).
The overlying switch allows to select the current mode between release and debug: the release mode produces a smaller and optimized program that run faster but doesn't allow to keep track of what's happening in the model. The debug mode instead, while running slower, allows to set breakpoints in the code (the red circles) where the execution of the model is halted and the modeller can inspect the situation of any variable within the current scope (right panel).
In the debug mode (to which the screenshot refers) the modeller can also inspect the whole stack leading to that specific point, that is, the list of function calls made up to the point, and can decide where to set the next breakpoint: to the next manually set breakpoint, to the next line, to the first line of the next called function or to the next line of the calling function (therefore executing all the remaining code of the current function until its return).
While the application is debugged it runs as a normal program on its own windows if in GUI mode or under the panel “Application Output” if in console mode.
Deploying FFSM
Optionally FFSM can be packaged in an easy to be used self-installer for Windows.
It is enough to download and install the Nullsoft Install System and, from the windows explorer, right click on the provided windowsInstallerScript.nsi file and select “Compile NSIS Script”. This is a very simple script that can be edited where appropriate with any text-editor.